

8 Tweaks To Find Your Perfect Snowboard Setup and Stance
Small changes and tweaks can lead to wonderful new feelings in your snowboarding. Especially, when it comes to your snowboard setup. To find the best position for your body type and riding style, it can help to play around with your snowboard setup.
I had been riding with a set stance for years which felt comfortable and stable. However, I made some small changes last season and it opened up a whole new world. It improved my mobility, rotation, power transfer between turns and ability to absorb difficult terrain.
Your equipment is your connection to the snow. Your comfort level, mobility and ability to perform the board is influenced by what your stance is and how it is set up. Try the 8 tweaks in this post to find your perfect snowboard setup and get the most enjoyment out of your gear and time on snow. All it takes is a binding tool or screwdriver!
8 Tips On Your Snowboard Setup
- Stance Width
This is how far apart your feet are when strapped in. A general rule of thumb for stance width is to have your feet shoulder width apart or just a little wider. Another way to test your stance width is to use the position your feet naturally take as you do a squat. Take the bindings off, stand on the board, do some squats and mark the position where it feels best. Then attach the bindings there. A stance that is too wide or too narrow will inhibit your mobility. It can take a lot of testing to find the optimal stance that works best for your body. If you change your stance width, it can feel strange and awkward for the first few runs. Try to ride for at least a morning or afternoon in the new stance to fully test it out.

Your snowboard setup will directly influence your comfort and enjoyment. Take the time to learn what works for you and your body.
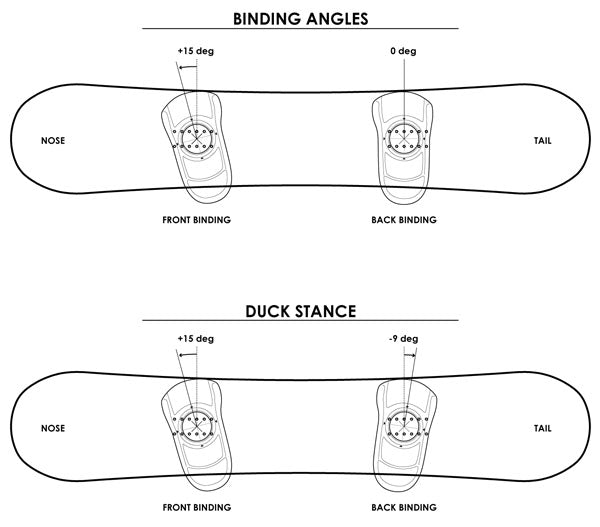
- Binding Angles
The angles the front and back bindings are set at.
- Binding near the nose usually has a positive angle
- Binding near the tail usually has a negative angle.
It's helpful to set the angles to a position that is comfortable and natural for your body type and riding style. A ducked stance is generally the best and most versatile option (eg. +12 on front foot, -12 on backfoot). This makes it a breeze to ride switch, as you can steer more effectively. Also, it's easy on your knees and a comfortable position to stand in all day when snowboarding.

Start at 9 on the front foot, -9 on the back foot. Tweak for comfort by playing with angles. 15 on the front foot, -12 on the back foot. Or even 18 on front foot, -15 on back foot.
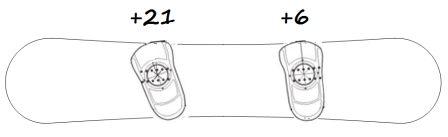
A "race" stance that is seen in an older carving snowboard setup has positive angles on both bindings. This places the rider in a more open position to encourage easier lateral movement with the hips across the board. As a result of the more open position, over time it can be uncomfortable, as well as difficult to do freestyle.
- The Position of Bindings Tip to Tail
This dictates how much nose or tail your board has. Starting slap bang in the centre is always a good place to develop preference and awareness from. Some board styles like powder or all-mountain, will have a slightly longer nose when the stance is centred. True twin boards will give the option to have equal amounts of nose and tail. This makes it easier to ride, balance and land tricks in switch.

Your Snowboard Equipment Is Your Connection To The Snow
- The Position of Bindings Edge to Edge
This can affect how much toe or heel overhang you have. As you lean and bend through turns to get the board on edge, over-hang from the toes or heels will mean you can catch or drag them in the snow. You will want to centre the boot on the board so that there are equal amounts of toe and heel overhang. If you have big feet ride a wide size snowboard so that you minimise overhang. Strap your boots in (feet not in them) and turn the board upside down to check if they are centred on the board. You will clearly see if the boots are further over one edge compared to the opposite. Example - If the boot is centred and the toes stick out over the toe edge but the heel cup doesn't poke out at all. You can set the binding back towards the heel edge, so you reduce the over-hang on the toes and equal it out in the heels.

- Forward Lean On Binding Highbacks
Most bindings will have a forward lean option that dictates the position of the highback and how it affects your lower body. If you increase the forward lean, it will push the knees and ankles into a more flexed position. This can make it more responsive when turning on to heel edge and easier to bend down through the lower joints. Forward lean can make a big difference if you are struggling to get a true carve on heel edge. Not as useful for boxes and rails, because it encourages more of an edge to slide out on.

- Aligned Highbacks
In most modern bindings you can rotate the highback. Response and comfort improve when the highbacks align with / run parallel to the heel edge. This makes for an easier edge to edge transfer and allows the boots to flex more naturally when trying presses or tweaking grabs.

- Adjustable Toe on Baseplate
Most baseplates will have an extendable and retractable toe piece that looks like a pedal. This is to ensure direct connection and power transfer between the boots and the board. If your boot overhangs, the pedal will be sitting further down your foot away from your toes / end of the boot. Make an adjustment to ensure your toes and the pedal line up at the top. If you choose a small binding and are a larger boot size, you may need to extend the toe pedal so that it curls up to naturally cup underneath the toes.
- Regular or Goofy
Before you set off on your ride, you need to determine your natural lead foot. Or if you have been riding for years and not done much switch riding, it's an amazing way to quickly improve and learn new things.
- Left foot as the lead foot = regular
- Right foot as the lead foot = goofy
If you have done any other board sports like skating or surfing you should have a good idea of what foot will be comfortable to lead the way. If you aren’t sure, your dominant foot should be the back foot (the foot you would kick a football with). Or imagine running then sliding on ice, which foot would you put out first? This will be your front foot. If someone was to push you when standing with your legs together, which leg would you put out first to regain balance? Check out this awesome article from TransWorld on how to pick.
To optimise your snowboard setup and stance can take a lot of time and tweaking. Never be afraid to try something new for a couple of runs. If you don't like it you can always change it back. Sometimes making the smallest change can have a hugely beneficial effect on your comfort, mobility and rider performance.